
If you want to insert short-code in the .php code you can do it this way :
<?php
    echo do_shortcode('[ ..... ]');
?>
If you want to insert short-code in the .php code you can do it this way :
<?php
echo do_shortcode('[ ..... ]');
?>
Sometimes you may not want to display a Heading on a page in Word Press, aren’t you ???
The problem is that then in the beginning of the page you have one giant sore empty space. What can you do ?
Very easy.
First find the class of the heading parent div tag using Inspect.
Then add something like this in a custom-html block in the page Editor. (this the class name in my case, yours could be different)
<style>.entry-header {display:none}</style>
I did it on the HOME page
A Side Column is very nice and useful thing. I like it a lot ..and … You are expecting a BUT, right ?
But on articles with intricate layout things get squashed and mangled. And after the initial widgets area you waste useful space. The second column is normally top heavy. Adding more data or widgets does not help much, because nobody looks after 1 page-scroll the right side.
So the solution is to keep the Side Column, but allow the user to Fold and Unfold it. And that is the task at hand. I will explain how I did it with my theme Blogstream, you then can abstract the instructions for your case. BTW, very nice and clean theme and once I’m finished with the tweaks and minify the style.css it will become lean and fast 😉
So lets start …
The first thing is the obligatory research with the browser DevTools. The goal is to find the element/s and/or class/es which you can tweak to hide the column. I had partial success , so I reached out to the creator of the theme, who was nice enough to reply back with the additional info.
So this was going to suck … earlier in my tests I saw that html elements DOM manipulation won’t work as I wanted … I have to manipulate the CSS class rules. Those two :
.col-2cl .main-inner { padding-right: 0; }
.col-2cl .s1 { display: none; }
Have not done that before … but I conjectured there have to be something like DOM for CSS … and yes there is.
The sucky part about CSSDOM (that’s what it is called, clever 😉 ) is that there is no XPATH-thingy for search, everything is linear search through LoL of CSS-Stylesheets and rules.
So I had to find those two rules amongst tens of stylesheets and hundreds of rules per sheet. I was about to forget about it and skedaddle …. it will be slooow. But then again where is the fun. So I persisted and decided to go ahead and do it.
I would not only had to write the code, but also had to integrate it in WordPress.
From before I’ve looked at plugin called WP Coder. Again, a lot of coolness, the plugin allows you to write HTML,JS,CSS and files and then embed them with the short-code in only specific places.
I on the other hand needed the code to be on every page … 1,2,3 … and why not put the short code in the footer.
But before that I had to write the code and test it somehow on Word Press. So I wrote the JS code to toggle the Side column and named it “side_bar” in WP Coder. Then created a test page and embed the short code : . Now I could test w/o breaking the whole site.
Lets review the code before I explain how I tested it.
The loopy find_css_rule() function goes trough all the style sheets and rules to find the css-selectors. If it finds them the function returns the indexes, so I can refer back directly. And btw it is not that slow.
That out of the way, the rest is easy. One function to check the state of the Side column, two to Fold/Unfold and finally toggle_sidebar() to unite them all.
All the Functions are specific to my case, but once the search problem is solved the rest is easy, so don’t despair.
function find_css_rule(selector) {
	let s = 0
	for (let sheet of document.styleSheets) {
		let r = 0
		for (let rule of sheet.cssRules) {
			if (rule.selectorText == selector) {
				console.log("Sheet:"+s+", rule:"+r)
				return [s,r]
			}
			r += 1
		}
		s += 1
	}
}

function is_sidebar_folded(rule) {
	return rule.style.display == 'none' ? true : false
}

function fold_sidebar(ruleP, ruleD) {
	ruleP.style.paddingRight = '10px'
	ruleD.style.display = 'none'
}

function unfold_sidebar(ruleP, ruleD) {
	ruleP.style.paddingRight = '340px'
	ruleD.style.display = ''
}

function toggle_sidebar() {
	let padding = find_css_rule('.col-2cl .main-inner')
	let display = find_css_rule('.col-2cl .s1')
	if (! (padding && display)) {
		console.error('Could not find the side bar classes !')
		return
	}
	//use the idxs for direct access
	let ruleD = document.styleSheets[display[0]].cssRules[display[1]]
	let ruleP = document.styleSheets[padding[0]].cssRules[padding[1]]

	if (is_sidebar_folded(ruleD)) {
		unfold_sidebar(ruleP,ruleD)
	} else {
		fold_sidebar(ruleP,ruleD)
	}
}
Two final things to mention. I on purpose use verbose function names, so I can lower the probability of name conflict. And second I split the task to many but small Functions. The reason ? It easier for testing, but most importantly follows the KISS principle.
So how did I tested it ?
Now the test page has the code, so I went in Preview mode and launched DevTools (Inspect) and in the Console typed :
worked flawlessly … then tried several times toggle_sidebar() … charming.
That done I added a link to the Test page for the sake of it
that worked too … now I was ready to set it up site-wide by setting up the short-code in the footer
Slowly …
carefully somewhere at the end I added the following :
<?php
    echo do_shortcode('[WP-Coder title="side_bar"]');
?>
updated the file and was ready for the last step i.e. setting up button or something so I can visually toggle the Side column.
The obvious choice is to put something in the upper right corner of the first column. The problem is that is the article header space which is simple H1 tag, so I quickly created a table to host the header and my triple arrow character in Inspect mode.
Once I made it work I was ready to mess up page.php this time. Again with caution, I just found :
<header class="entry-header group">
	<h1 class="entry-title"><?php the_title(); ?></h1>
</header>
and replaced it with this :
<header class="entry-header group">
	<table width="100%"><tr>
	<td><h1 class="entry-title"><?php the_title(); ?></h1></td>
	<td align=right>
		<a href="#" onclick="toggle_sidebar()" style="font-size: 35px;text-shadow:0 2px 3px #999c9f; color:#0e7fe3;">⇶</a>
	</td>
	</tr></table>
</header>
Updated the file, tested it … and finito.
This direct change is a bit jumpy … so I have to figure out how to make a smooth transition.
Also it will be nice the triple arrow to be more animated.
But will leave that for a time when I have more time.
BTW to see the result you have to go to a Page on this site, for now I’m keeping post.php unchanged.
The other day I started using TAB’s from Ultimate Addons for Gutenberg (UAG) but there was a conflict with my THEME.
Because the tabs are implemented using <li><a>TAB</a></li> they had annoying mini squares from the <li> tag and underline from <a> tag … so I had to figure out the responsible CSS classes.
Once I found them using the browser Inspect tool (right click) :
.entry ul li, .entry ol ul li {
    list-style: square;
}
.entry a {
    color: #1b2b47;
    box-shadow: 0 1px 0 #aeb3c7;
}
I had to just exclude those rules for the UAG tab elements using not as seen below.
.entry ul li:not(.uagb-tab), .entry ol ul li {
    list-style: square;
}
.entry a:not(.uagb-tabs-list) {
    color: #1b2b47;
    box-shadow: 0 1px 0 #aeb3c7;
}
I still left the 1px underline for the hover effect.
There are many ways to convert Jupyter notebook and then integrate it in WordPress. But what if I tell you can do it on the fly !!! Yes initial installation is a bit involved but afterwards you only need to insert a simple short-code.
This all is made possible by a plugin WP pusher and a tool NBConvert. The role of the WP pusher is to accommodate the install the NBConvert directly from github to your WP installation but most importantly to transfer of your notebook from github to your WP site.
Here is the Procedure :
The nbconvert only converts the notebook the images are broken. When I resolve the issue I will write another post… search for it by using the tags.
Do not do any changes to your site until you read the full Post !
Everyone is aware of the permalinks capability of WordPress, but for sites with fully or partially hierarchical structure there is an additional feature which can make your site easier to navigate and understand.
The idea is for the hierarchical part of your site to use this hierarchy in building your permalink. For example the following page “Learn Java” based on the structure of this site the permalink can be :
It is clear that the last one is the superior link if you know that every word in this link represents a page.
Again I’m emphasizing that you do that only for the parts of the site that exhibit hierarchy.
So if all what I said apply to your case, how do you do it ?
There is an option in the side panel in the Block editor where you specify Parent page, but if are like me and learned about this after the fact then you would use the Quick edit in the Dashboard > Pages > All Pages list (like shown below) to do the modifications.
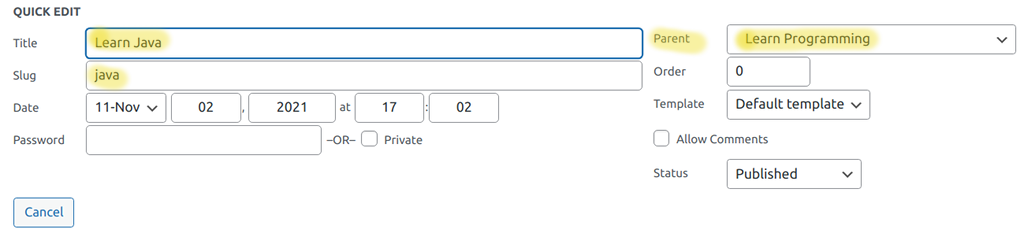
Set all the pages in the hierarchy in the following manner :
Why do you see the yellow highlights ? Because there are several things to account for that you have to take into consideration.
First you want your Title to stay descriptive, so you may keep it as it is.
Second your slug should be shorter because it is now part of the hierarchy. You don’t want to put there learn-java, because your permalink will become learn/programming/learn-java. We don’t want that.
The third thing is that if this page is a part of a menu you may have a different text there because of a space constraint.
In this site I have even deeper hierarchy : /understand/programming/languages/java/
But as you see I have many sub-hierarchies, instead of ONE, because otherwise the URL will get too long.
So you like the idea and want to jump in … A, a, a … not so fast. Changing the structure of your site means broken links. So before you start find yourself a plugin to mop up after you break some eggs.
I used “Broken Link Checker“.
Now you are good to go ….
I was looking for a plugin to generate RSS feed from this site and all I was finding was RSS Aggregators. The reason is that by default WordPress generates RSS feeds by default.
So I just have to tell where they are ;\
Here an easier way to access the feed is to use the Permalink format URL :
| single category | http://www.example.com/category/categoryname/feed |
| single tag | http://www.example.com/tag/tagname/feed |
| multiple categories | http://www.example.com/category/cat1+cat2/feed |
| multiple tags | http://www.example.com/tag/tag1+tag2/feed |
For more exciting options check out the WP docs
I was looking to get a list of my Plugins, but I’m too lazy to copy and paste twenty times. So I did this :
$x('//td[contains(@class,"plugin-title")]/strong').map(a => a.innerText).toString()

'Advanced Editor Tools (previously TinyMCE Advanced),Akismet Anti-Spam,All-in-One WP Migration,.....'
BTW in the browser console yo u can use $x(…) to find elements by using XPath.
enjoy …
This is an more advanced version of [Create Popup window].
The idea is to embed programming Language Console/IDE into a WordPress page with ability to pop-up the IDE out of the page. We will do that with the wonderful OneCompiler IDE, which supports myriad of languages.
We have two problems to solve :
Let start with the themless post.
<script type="text/javascript">
   function console_url() {
      //extract language from QS
      let params = (new URL(document.location)).searchParams;
      let lang = params.get("lang")
      lang = lang ? lang : 'python';//default
      return "https://onecompiler.com/embed/" + lang + "?hideStdin=true&hideTitle=true";
   }
</script>
<iframe frameborder=0 marginwidth=0 marginheight=0 height="450px"
src='' onload='this.onload=null;this.src = console_url();' width='100%'></iframe>
This need explanation ! The pop up page uses the query string ?lang=ABC to decide which Language IDE to render.
The problem is we don’t have access to PHP, so we will trick the IFRAME (which renders the IDE).
We will leave the .src attribute empty and in .onload will call a function console_url() that returns the correct OneCompiler IDE url which we dynamically apply to .src.
The reason we have this.onload=null is to prevent the recursive loop of loading .src triggering onload, which tries to load, which triggers onload …
The goal of console_url() is to extract the parameter lang from the query string and build the correct IDE url.
Now that we got the Pop-up let’s embed the IDE in the …
Here we have a IFRAME for the embedded IDE, this time without using tricks and second a link to call the popup() function.
The function opens the Popup-page we just created in a new window. After that it removes the link and the IDE from the main page. Here goes :
<script type="text/javascript">
   function popup(lang){
      let url = 'https://myriad.website/lang-console/?lang=' + lang
      window.open(url,'win','width=640,height=350,menubar=0,titlebar=0,status=0,toolbar=0');
      document.getElementById('console').style.display='none';
      document.getElementById('console_link').style.display='none';
   }
</script>
<a id="console_link" href="" onclick="popup('python')" target="_blank" rel="noopener">
   <b>Click to popup the console, if you want to move it around !</b></a>

<iframe id=console frameborder="0" marginwidth="0" marginheight="0" height="300px" src="https://onecompiler.com/embed/python?hideStdin=true&hideTitle=true" width="100%"></iframe>
So finally you can embed different Language IDE’s on different pages by using only one Popup page, you just need to change popup(‘python’) onclick call with whatever you need.
The other important thing, we learned how to use query string to make decisions w/o using PHP. Wont tell you now, but you can use similar approach to render conditionally based on which page you are. There is no plugin for that 😉
Here is it in action : [Learn Python]
In Word Press normally you can modify most of the part of the page via the Theme, but elements such as the <body> tag are inaccessible.
The solution is to use the wp_footer() hook and put a javascript code to update the element.
Here are the steps to do that :
add_action("wp_footer", "body_onclick");

function body_onclick(){
    if(is_page("user-page")){ ?>
    <script>
        let body = document.getElementsByTagName("body");
        body[0].setAttribute("onclick", "alert('hi');");
    </script>
<?php }
}
Of course you can change the style instead of onclick.
In addition there are also other possible page selection criteria :
is_archive()is_home()is_front_page()